标题:日志记录

所有Moleculer的核心模块都有一个自定义日志记录器实例。 这些记录器是从服务管理器实例继承而来,可以在 broker options 中进行配置。

v0.14 版本包含了不兼容的更新。 你不能直接使用旧版本的配置方式了。 如果你使用的是内置的默认控制台日志记录器,本次更改不受影响。 更新信息参见 Migration Guide

内置日志记录器

Console (默认)

这个记录器将所有日志消息打印到 console。 它支持几个内置的格式化器或者您也可以使用您的自定义格式化器。

使用默认选项的简短配置

// moleculer.config.js
module.exports = {
logger: "Console",
};

// moleculer.config.js
module.exports = {
// Enable console logger
logger: true,
};

完整配置

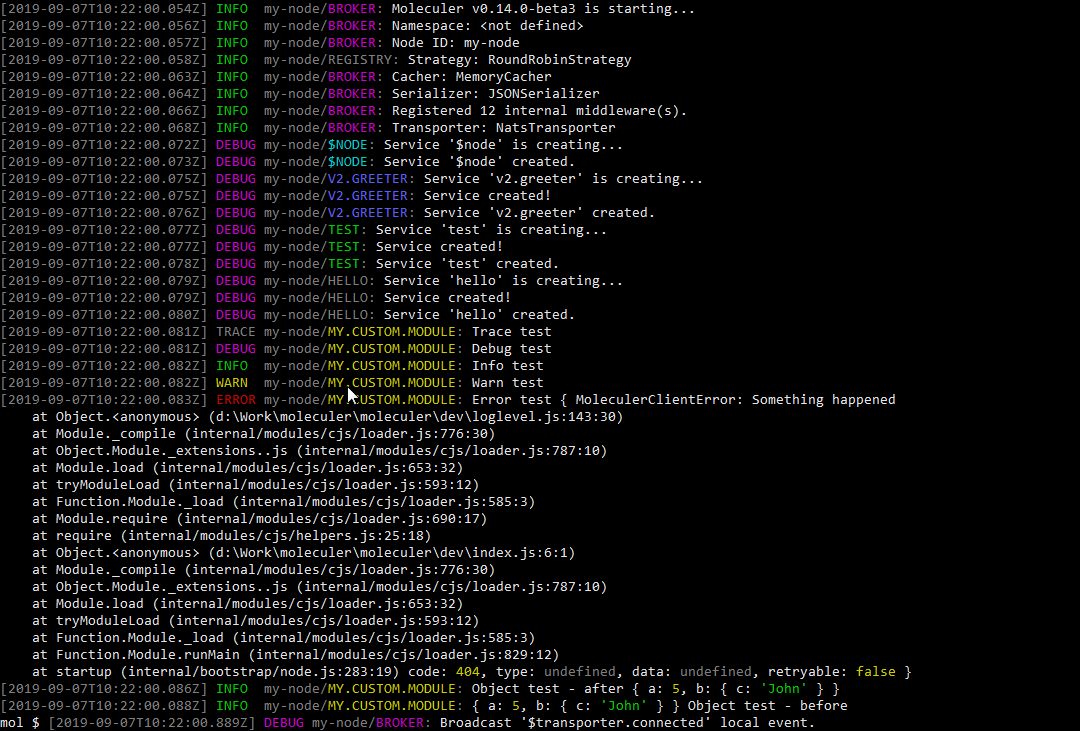
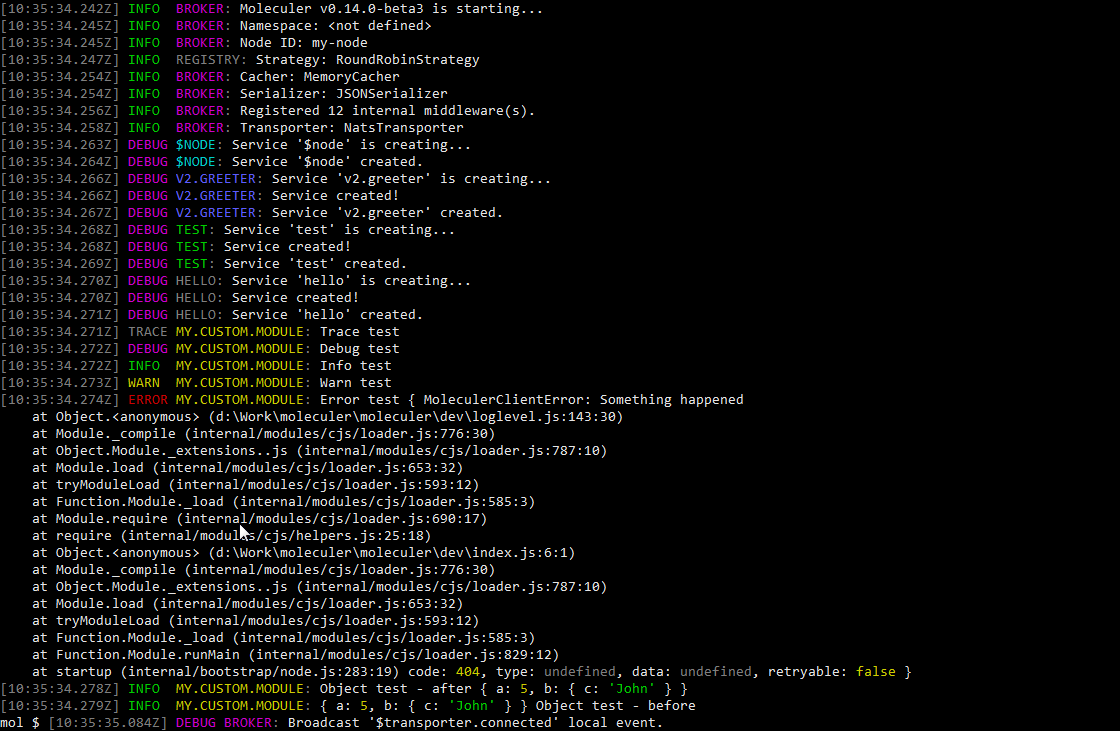
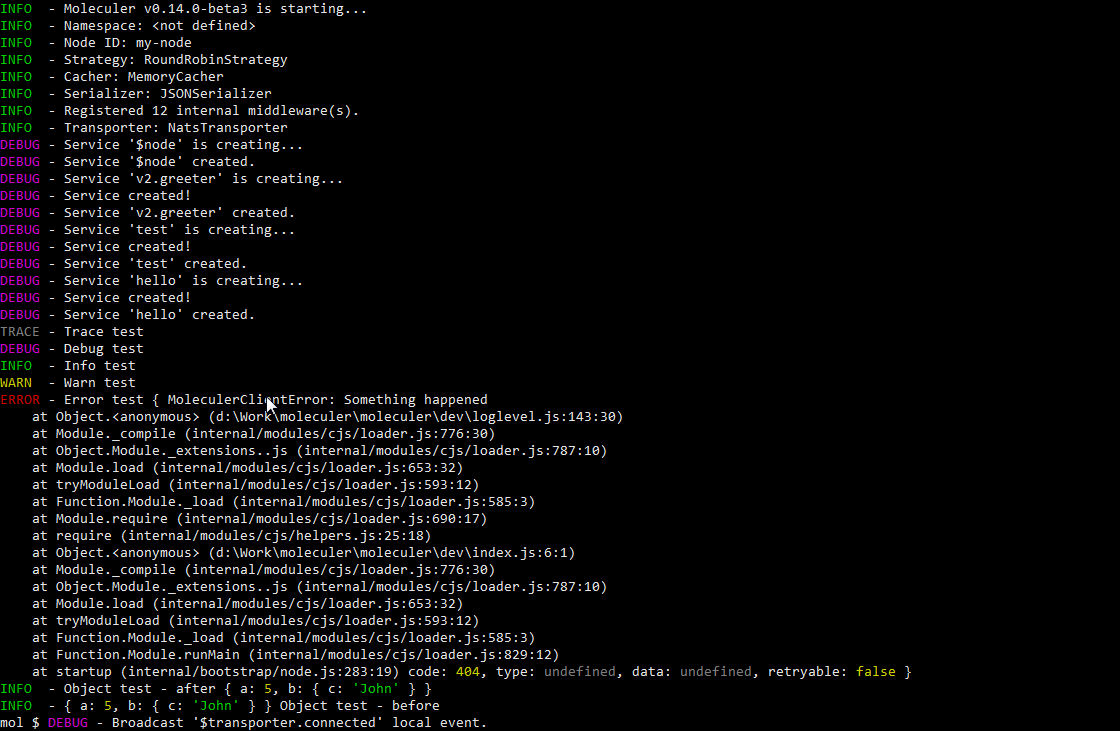
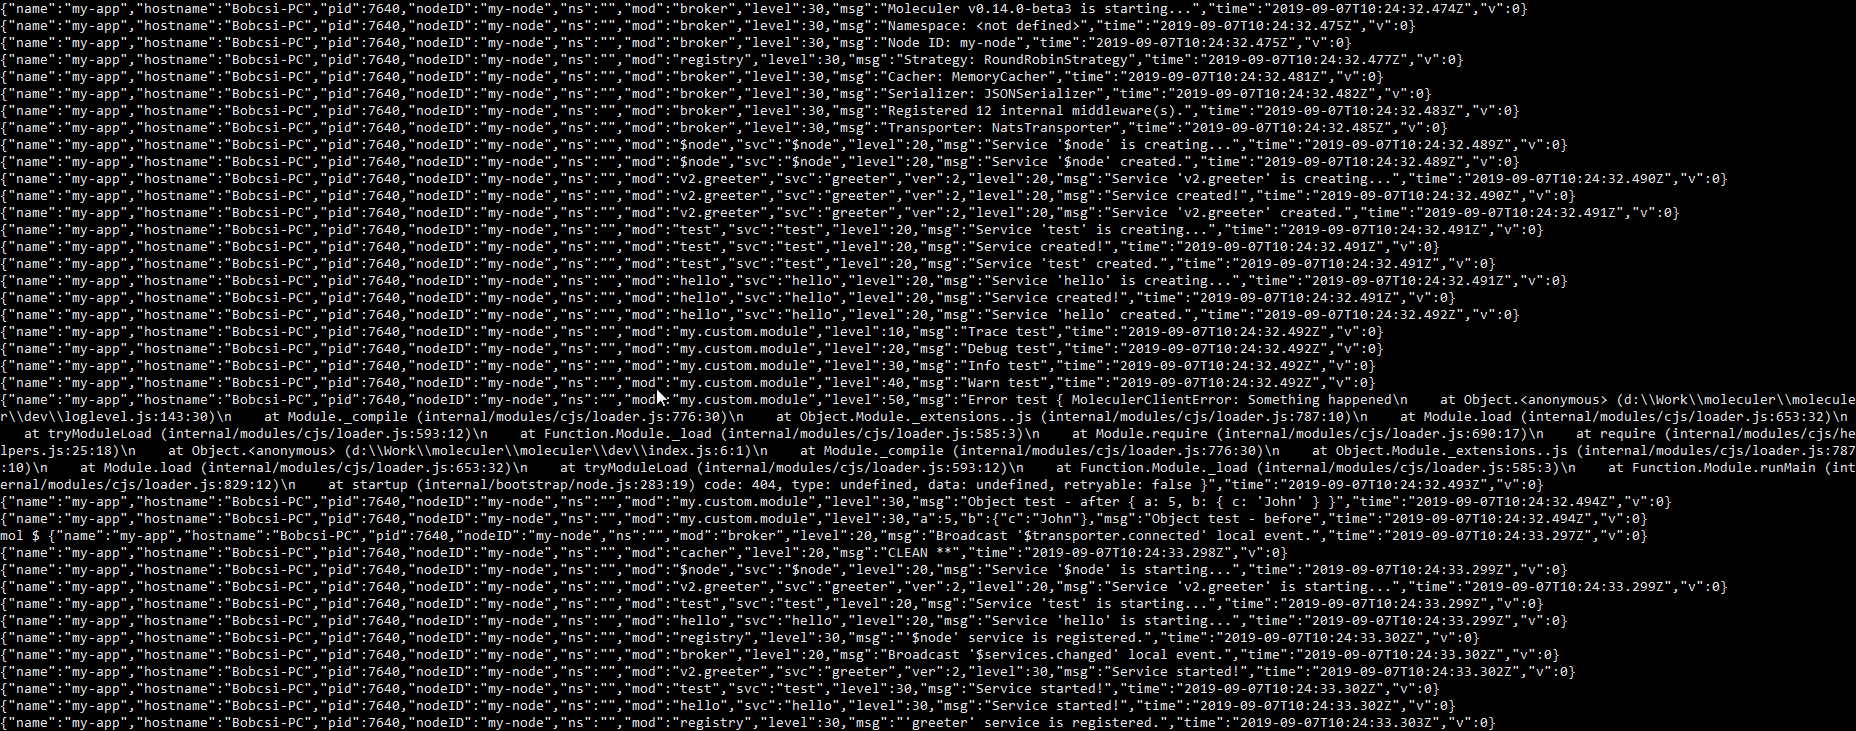
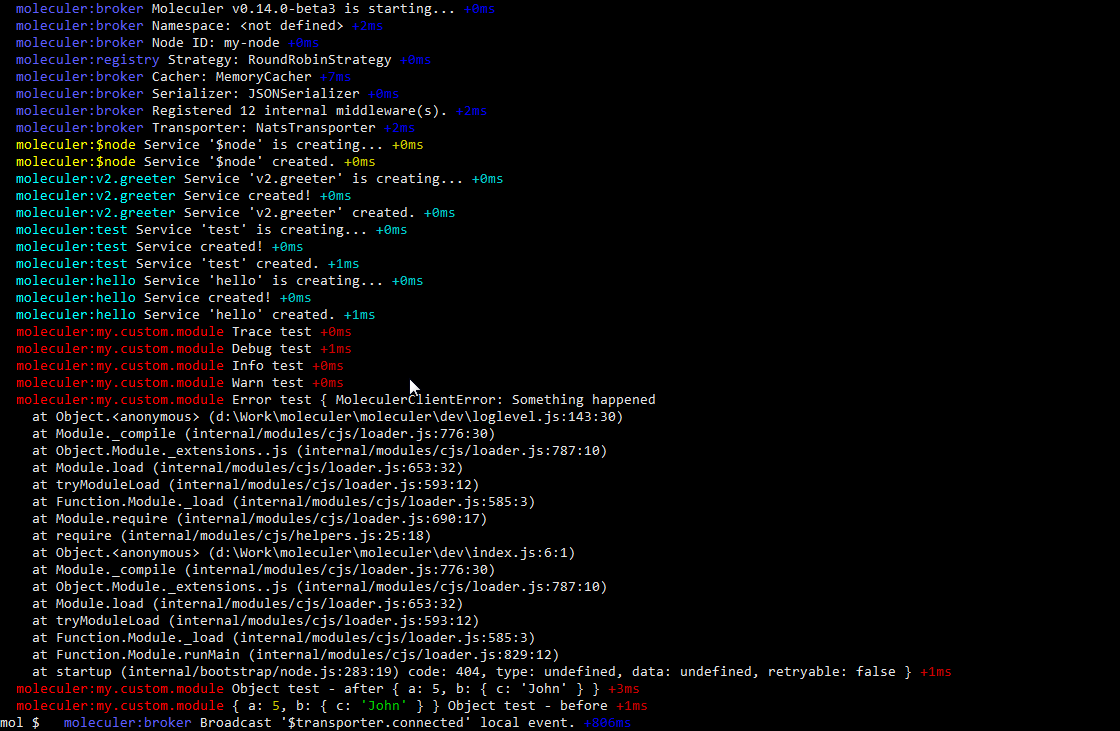
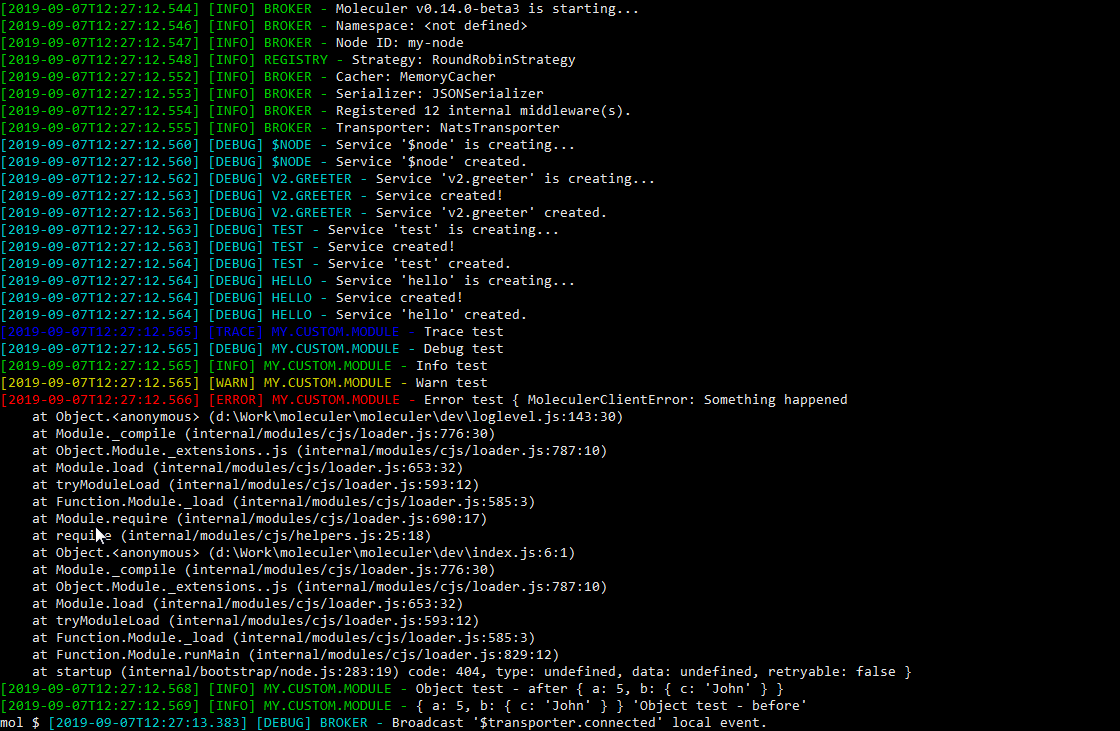
// moleculer.config.js
module.exports = {
logger: {
type: "Console",
options: {
// Logging level
level: "info",
// Using colors on the output
colors: true,
// Print module names with different colors (like docker-compose for containers)
moduleColors: false,
// Line formatter. It can be "json", "short", "simple", "full", a `Function` or a template string like "{timestamp} {level} {nodeID}/{mod}: {msg}"
formatter: "full",
// Custom object printer. If not defined, it uses the `util.inspect` method.
objectPrinter: null,
// Auto-padding the module name in order to messages begin at the same column.
autoPadding: false
}
}
};

格式化器

完整的 格式化器 (默认)
// moleculer.config.js
module.exports = {
logger: {
type: "Console",
options: {
formatter: "full" // or `null`
}
}
};

预览 Console

简短 格式化器
// moleculer.config.js
module.exports = {
logger: {
type: "Console",
options: {
formatter: "short"
}
}
};

预览 Console

简单的 格式化器
// moleculer.config.js
module.exports = {
logger: {
type: "Console",
options: {
formatter: "simple"
}
}
};

预览 Console

json 格式化器
// moleculer.config.js
module.exports = {
logger: {
type: "Console",
options: {
formatter: "json"
}
}
};

预览 Console

自定义格式化器
// moleculer.config.js
module.exports = {
logger: {
type: "Console",
options: {
formatter: (level, args, bindings) => [`[${level.toUpperCase()}]`, ...args]
}
}
};

预览 Console

File

这个记录器将所有日志消息保存到文件 。 它支持 JSON & 已经格式化的文本文件或您也可以使用您的自定义格式的文件。

使用默认选项的简短配置

// moleculer.config.js
module.exports = {
logger: "File",
};

它将把日志消息保存到当前目录中的 logs 文件夹中,使用 moleculer-{date}.log 作为日志文件名。

完整配置

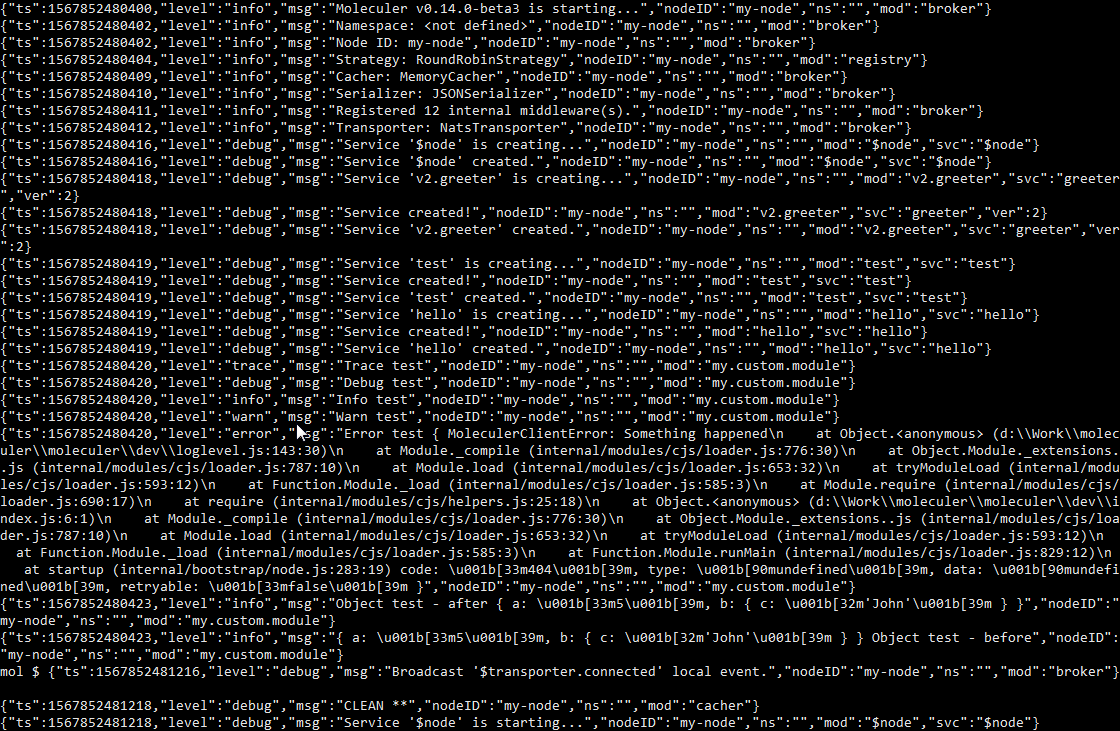
// moleculer.config.js
module.exports = {
logger: {
type: "File",
options: {
// Logging level
level: "info",
// Folder path to save files. You can use {nodeID} & {namespace} variables.
folder: "./logs",
// Filename template. You can use {date}, {nodeID} & {namespace} variables.
filename: "moleculer-{date}.log",
// Line formatter. It can be "json", "short", "simple", "full", a `Function` or a template string like "{timestamp} {level} {nodeID}/{mod}: {msg}"
formatter: "json",
// Custom object printer. If not defined, it uses the `util.inspect` method.
objectPrinter: null,
// End of line. Default values comes from the OS settings.
eol: "\n",
// File appending interval in milliseconds.
interval: 1 * 1000
}
}
};

外部日志记录器

Pino

这个记录器使用 Pino 记录器。

使用默认选项的简短配置

// moleculer.config.js
module.exports = {
logger: "Pino",
};

完整配置

// moleculer.config.js
module.exports = {
logger: {
type: "Pino",
options: {
// Logging level
level: "info",

pino: {
// More info: http://getpino.io/#/docs/api?id=options-object
options: null,

// More info: http://getpino.io/#/docs/api?id=destination-sonicboom-writablestream-string
destination: "/logs/moleculer.log",
}
}
}
};

若要使用此记录器,请使用 npm install pino --save 命令安装 pino 模块。

预览 Pino

Bunyan

这个记录器使用 Bunyan 记录器。

使用默认选项的简短配置

// moleculer.config.js
module.exports = {
logger: "Bunyan",
};

完整配置

// moleculer.config.js
module.exports = {
logger: {
type: "Bunyan",
options: {
// Logging level
level: "info",

bunyan: {
// More settings: https://github.com/trentm/node-bunyan#constructor-api
name: "moleculer"
}
}
}
};

若要使用此记录器,请使用 npm install bunyan --save 命令安装 bunyan 模块。

预览 Bunyan

Winston

这个记录器使用 Winston 记录器。

使用默认选项的简短配置

// moleculer.config.js
module.exports = {
logger: "Winston",
};

完整配置

// moleculer.config.js
const winston = require("winston");

module.exports = {
logger: {
type: "Winston",
options: {
// Logging level
level: "info",

winston: {
// More settings: https://github.com/winstonjs/winston#creating-your-own-logger
transports: [
new winston.transports.Console(),
new winston.transports.File({ filename: "/logs/moleculer.log" })
]
}
}
}
};

若要使用此记录器,请使用 npm install winston --save 命令安装 winston 模块。

预览 Winston

debug

这个记录器使用 debug 记录器。 要查看消息,您必须将 DEBUG 环境变量设置为 export DEBUG=molecule:*

使用默认选项的简短配置

// moleculer.config.js
module.exports = {
logger: "Debug",
};

完整配置

// moleculer.config.js
module.exports = {
logger: {
type: "Debug",
options: {
// Logging level
level: "info",
}
}
};

若要使用此记录器,请使用 npm install debug --save 命令安装 debug 模块。

预览 debug

Log4js

这个记录器使用 Log4js 记录器。

使用默认选项的简短配置

// moleculer.config.js
module.exports = {
logger: "Log4js",
};

完整配置

// moleculer.config.js
module.exports = {
logger: {
type: "Log4js",
options: {
// Logging level
level: "info",

log4js: {
// More info: https://github.com/log4js-node/log4js-node#usage
appenders: {
app: { type: "file", filename: "/logs/moleculer.log" }
},
categories: {
default: { appenders: [ "app" ], level: "debug" }
}
}
}
}
};

若要使用此记录器,请使用 npm install log4js --save 命令安装 log4js 模块。

预览 Log4js

Datadog

这个记录器上传日志消息到 Datadog 服务器。

请注意,这个记录器不会将任何消息打印到控制台,仅收集 & 上传。 在另一个同时打印消息的记录器侧使用它。

使用默认选项的简短配置

// moleculer.config.js
module.exports = {
logger: "Datadog",
};

完整配置

// moleculer.config.js
module.exports = {
logger: {
type: "Datadog",
options: {
// Logging level
level: "info",
// Datadog server endpoint. https://docs.datadoghq.com/api/?lang=bash#send-logs-over-http
url: "https://http-intake.logs.datadoghq.com/v1/input/",
// Datadog API key
apiKey: process.env.DATADOG_API_KEY,
// Datadog source variable
ddSource: "moleculer",
// Datadog env variable
env: undefined,
// Datadog hostname variable
hostname: os.hostname(),
// Custom object printer function for `Object` & `Ąrray`
objectPrinter: null,
// Data uploading interval
interval: 10 * 1000
}
}
};

预览 Datadog Log Explorer

使用多个日志记录器

这个新的日志记录器配置类型管理多个记录器的使用,即使是来自相同的记录器类型和不同的日志级别。

定义不同日志级别的多个日志记录器

// moleculer.config.js
module.exports = {
logger: [
{
type: "Console",
options: {
level: "info",
}
},
{
type: "File",
options: {
level: "info",
folder: "/logs/moleculer",
filename: "all-{date}.log",
formatter: "{timestamp} {level} {nodeID}/{mod}: {msg}"
}
},
{
type: "File",
options: {
level: "error",
folder: "/logs/moleculer",
filename: "errors-{date}.json",
formatter: "json"
}
}
]
};

此示例展示 Console 保存到 File 记录器配置成将所有日志信息保存到格式化文本文件中, File 只保存错误信息的 JSON 格式。

Filtering

你可以配置你的日志记录器为只记录某些服务或模块的数据。 示例

// moleculer.config.js
module.exports = {
logger: [
// Shorthand `Console` logger configuration
"Console",
{
// This logger saves messages from all modules except "greeter" service.
type: "File",
options: {
level: {
"GREETER": false,
"**": "info"
},
filename: "moleculer-{date}.log"
}
},
{
// This logger saves messages from only "greeter" service.
type: "File",
options: {
level: {
"GREETER": "debug",
"**": false
},
filename: "greeter-{date}.log"
}
}
],

logLevel: "info" // global log level. All loggers inherits it.
};

日志级别设置

配置日志级别 您可以使用 broker 易知的 logLevel 选项,该选项可以是 StringObject。 然而,也可以用 options 选项的 level 属性覆盖全局日志级别。

复杂日志级别配置

// moleculer.config.js
module.exports = {
logger: [
// The console logger will use the `logLevel` global setting.
"Console",
{
type: "File",
options: {
// Overwrite the global setting.
level: {
"GREETER": false,
"**": "warn"
}
}
}
],
logLevel: {
"TRACING": "trace",
"TRANS*": "warn",
"GREETER": "debug",
"**": "info",
}
};

自定义日志记录器

如果你需要自定义日志记录器,你应该把它包装成 BaseLogger 类,并至少实现 getLogHandler 方法。

使用自定义记录器

// moleculer.config.js
const BaseLogger = require("moleculer").Loggers.Base;

class MyLogger extends BaseLogger {
getLogHandler(bindings) {
return (type, args) => console[type](`[MYLOG-${bindings.mod}]`, ...args);
}
}

module.exports = {
logger: new MyLogger()
};